Toggle switches are among the most common types of switches you will find in both residential and commercial buildings. They are also used in cars and electrical appliances. These types of switches are available in several variations, one of which is called the double-pole double-throw switch.
Abbreviated as DPDT, these types of switches can connect two separate devices. This means that the positions of the switch select one of the two devices. These switches typically have six prongs or pins. And in this article, we will be looking at how to wire a toggle switch with 6 prongs.
How do toggle switches work?
But before we look at how to wire one, it is important to understand how toggle switches work. These switches feature a handle, lever, or hinge that is operated manually. The lever can move forward or backward.
In this regard, the switch can either be on or off; when on, the switch allows current to flow, and when off, the switch interrupts the flow of electric current. In essence, the lever mechanism or toggle is used to switch electric current on and off.
What is a 6-prong toggle switch?
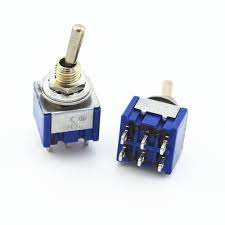
From its name, a 6-prong toggle switch has 6 terminals arranged in two rows of three terminals. Unlike a normal 3-prong toggle switch, this type of switch has three positions. There is the typical on/off, and then there is a momentary on position.
The 6 terminals are ground/neutral terminals and power terminals. All the terminals are used to control the flow of electricity to different circuits. And this is why these types of switches are typically used to control more than one appliance or device.
How to wire a toggle switch with 6 prongs
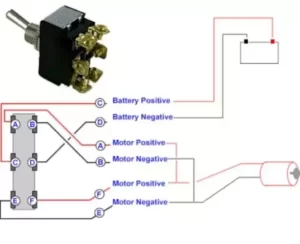
One area where the 6-prong toggle switch is used is automotive wiring. So we will look at how to wire a 6-prong toggle switch in a vehicle. With this kind of switch, you can control two different components, such as two lights.
Usually, the 6-prong toggle switch will have a set of 4 terminals at the bottom and two at the top. All the terminals are to be connected to the battery and the components you want to power.
Step one: Identify the terminals
In most cases, the prongs on the toggle switch will be numbered. For our example, the numbering is 8,7,2,3,4,5. In this configuration, terminals 8 and 7 are located at the top, with the rest at the bottom.
You need first to identify the power, output, and neutral terminals. The power terminal is the live wire that goes into the battery’s positive terminal. The ground/neutral terminal connects to the battery’s negative terminal.
In this regard, terminals 8 and 7 are positive and ground, respectively. The rest of the terminals are output terminals that connect the wires from the components.
Step Two: Connect the ground
Terminal 7 will be connected to the battery ground wire. Take a wire clip and use it to clip the ground terminal on the switch. This should be the wire coming from the battery.
Step three: Connect the positive wires
To make the wiring cleaner, you can jump the wires to the terminals so that you have only one positive connection from the switch to the terminal. To do this, take a pair of wire strippers and strip the insulation of the end of the positive wire from the battery.
Then take another wire and strip its insulation at the ends as well. Join the two wires together at the end and use an alligator clip to secure them. Test to ensure the wires are secure and do not come off when tugged on.
Add another wire to the end of the wire you just connect to the main positive wire. Once all wires are properly joined, take the main positive wire joint and connect it to terminal 8 of the switch. Take the two loose ends and connect them to the number 2 and 5 terminals of the switch.
Step Four: Connect the wires from the lighting
The next step will be to wire the wires coming from the two lights. There are typically two wires colored black and red. The black is the neutral, while the red is the positive or live wire. Take the two black wires from both lights and join them together.
The joined black wire should be connected to terminal 7 of the switch. Take the positive wire from one of the lights and connect it to terminal 3 and the wire from the other light to terminal 4.
Step Five: Troubleshoot the wiring
Test the lights to see if the lighting works. When the switch is in the on position, both lights should turn on. In the off position, both lights should turn off.
Uses of 6 pin/6 prong toggle switch
- These types of switches are used in lighting circuits to control multiple lights or control different lighting modes or brightness of different light sources
- They can also be used to control different motor directions or activate multiple motor speed settings.
- 6pin/6prong toggle switches are also used in audio equipment to control different appliances such as mixers and amplifiers.
- Also, these switches can be used to control different functionalities in a car, such as turning on/off different sets of lights.
Frequently Asked Questions
What do the numbers on a 6-pin toggle switch mean?
Different toggle switches come with different numbers on them. These numbers typically indicate which terminal is ground, positive, and output.
How many devices can a 6-pin toggle switch power?
On average, a 6-pin toggle switch can power two devices. The three sets of terminals are meant for two devices or circuits
Conclusion
When you want to control electrical current flow to two different pieces of equipment, the 6-pin toggle switch will be your best switch. Like other types of toggle switches, however, this type of switch is suited to low-voltage applications