One skill that all welders should learn is identifying good welds vs. bad welds. A bad weld can lead to some pretty disastrous results. This can be a loss of structural integrity and contamination of the base metal.
How do you identify a bad weld, and how is it different from a good weld? This is the question we will be looking to answer in this article. But first, let’s look at what a good weld is and how it looks like.
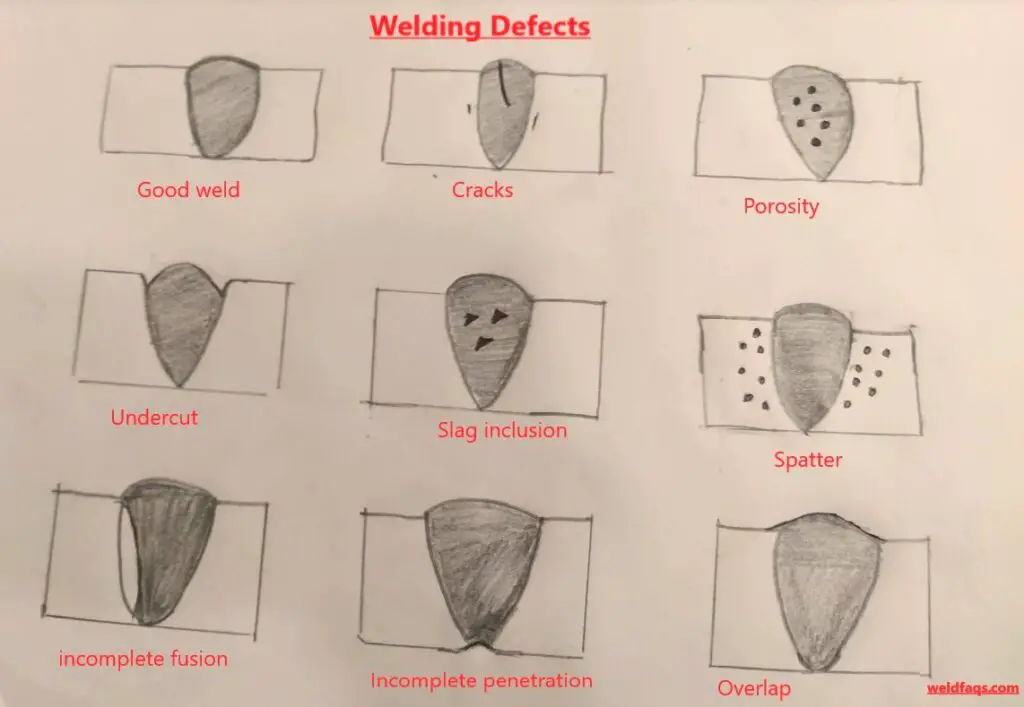
Identifying A Good Weld
Typically, a good weld will be uniform in width with no burns due to overheating. Also, the ripples are even and well feathered. There should be good penetration free of porosity, gas pockets, or inclusions in regards to penetration.
What are the characteristics of a good weld? The main qualities of a good weld are as follows;
Common Qualities Of A Good Weld

Good Penetration
Penetration is the depth of fusion of a weld. Deep penetration is essential in making a good weld. Without adequate penetration, the weld will be structurally weak and vulnerable to breaking.
Penetration will be dependent on the thickness of the base metal and the size of the filler rod. In a butt weld, the penetration should be 100% of the base metal thickness. For a fillet joint, though, the penetration percentage is 25 to 50% of the base metal thickness.
No Porosity
A good weld is free of porosity defects. So what is porosity, and how does it manifest in a weld.? Porosity manifests itself as pores appearing on the surface of the weld. These pores are caused by the solidification of oxygen and nitrogen gases as the weld pool cools.
There are several types of porosity. Distributed porosity are pores that are evenly distributed on the surface of the weld. These pores occur when gas particles become trapped in the weld pool when it is molten. The gases are then released when the pool cools, creating the pores.
Wormholes are elongated gas pores created when gases get trapped in the weld pool. Wormholes indicate that a large amount of gas has been trapped in the weld pool.
On the other hand, crater pipes are caused by the shrinking of the weld pool as it cools and solidifies. Again this occurs due to gases being trapped in the weld pool.
These three are the most common types of porosity, and for a weld to be considered good, it should not have any of them on the surface.
No Coloration
A good weld will have a color free appearance. Thus there will be no purple or blue hues on the surface of the weld. These color hues’ appearance indicates oxidation, which occurs due to a lack of proper or sufficient shielding gas.
The Profile
Depending on the type of weld, the finished surface will have either a flat, concave or convex profile.
How To Identify A Bad Weld
Now that we know what a good weld looks like, let’s take a look at what a bad weld looks like. From what we have already seen about a good weld, you may have an idea of how to spot a bad weld.
Ideally, a bad weld is a weld with defects that causes it to be structurally weak. These defects can range from porosity to weak penetration. Basically, any weld with any kind of defect is a bad weld. Some welding defects are below there.
Undercut As A Welding Defects
An undercut occurs when one piece does not fully penetrate its partner, meaning that part of the metal has been left unjoined. It usually happens when the welder does not have enough training or experience with the particular type of weld process they are using. It can be caused by a low torch angle, excessive penetration into one side of the base metal (filler), and high power input to make up for poor technique. A gas tungsten arc is a welding process that uses either oxygen or an inert gas and filler metal to melt metals on opposite sides of a joint, seal them together, and produce opaque beads on the edges of the joined area. This is all done within seconds during which there needs to be no air blowing into its place will lead to undercutting defects if it’s not done correctly. What causes these setbacks? Undercuts are caused by shrinking zones in front of and behind the molten pool that cause part of any steel plate being welded to be left unmelted.
These defects can lead to cracks, rotting, or reduced quality, all of which can make for a costly repair.
Spatter
Spatter is the spark of molten metal particles falling as droplets into the surrounding surface of the weld area during the welding operation. Welding spatter happens when the material becomes overheated and starts spitting out small particles of metal, which can result in an uneven surface finish. Spatters may also happen due to faulty equipment that has not been properly cleaned before use. It can be also caused by the excessive voltage to a low-current setting, improper shielding gas flow rates for specific metals being welded, and too much current intensity at high currents. Spatter is generally regarded as a nuisance because the spatter may also cause rusting or other corrosion.
Presence Of Porosity:
The presence of porosity in the weld metal is a visible sign of a bad weld. porosity is the presence of holes created from trapped shielding gas released. NO2, O2, and H2 gas are absorbed from the molten weld pool and become trapped in the weld metal when solidified and create porosity. It occurs because of incomplete shielding from molten slag protecting the base material being welded. The heat during welding causes gases inside the materials to be released into the air.
Incomplete Penetration:
Incomplete penetration or lack of penetration happens when the filler metal is unable to fill the root of the weld metal completely. This can occur when the torch is not held at a constant distance from the weld or if there are any variations in surface tension. It also occurs when too much filler material has been used and prevents molten metal to flow correctly into both edges of the joint, leading to incomplete fusion on one side.
Welding Crack:
Welding crack may be seen on the surface of the weld metal or fused zone. This defect will occur if the metal being welded has an elastic limit higher than its tensile strength. If too much pressure is applied to the molten material, or if it cools down too quickly, this type of crack can form. The heat and electricity from welding can cause the metals to expand and contract in different ways, which can result in a crack.
Lack of Fusion
Lack of fusion occurs when the two pieces being welded together, do not melt or fuse completely. This can be caused by a number of things such as:
-Incomplete penetration
-Undercut
-Lack of filler metal at one side of joint due to too much material having been removed during prepping in order to make the weld more aesthetically pleasing
-Excessive penetration into one side of base metal (filler)
-Low torch angle
-Molten material cooled down too quickly before it had a chance to fill the space completely, due to high heat input and low filler metal content in the molten pool.
Slag Inclusion
Slag inclusion is when molten slag from the welding process becomes trapped inside of a weld. This can be caused by too much filler metal being used, and not enough energy input to keep it moving out of the way before solidifying.
Under-Fluxed
Underfluxing occurs if there are any voids or air pockets within the molten metal. It can be caused by not enough filler metal, too much oxygen in the shielding gas, or a low torch angle.
Good MIG Welds VS Bad MIG Melds
MIG welding is perhaps the most common welding process used. So how can you tell if a MIG weld has been done right? Here are some of the indicators of a good MIG weld
Signs of a good MIG weld
- A smooth and consistent weld with no discolorations
- No cracks on the weld bead
- Some coloration on the base metal
- A flat bead profile that is neither convex nor concave
Signs of a bad MIG weld
- An overly thin welding line
- No discoloration of the parent metal
- The appearance of cracks down the middle of the bead
- No uniformity on the welding line
Tips For Good MIG Weld
- Set the right amperage: If the heat input is not sufficient, this will lead to a lack of penetration. On the flip side, a high heat input can lead to burn through on thinner sheets of metal. As such, it is essential to set the amperage of the welder to match the thickness of the base metal.
- Set the gas flow rate to between 30 to 40 cubic ft per hour. Also, if using a C02 gas mixture, special gas flow meters are designed for C02 gas.
- MIG welding requires a clean metal surface. As such, ensure the base metal’s surface is free of rust, paint, and dirt before welding.
- Use a 5-10 degree push angle when holding the MIG torch for welding.
Good Stick Welds Vs. Bad Stick Weld
Stick welding can be used on rusted, dirty, or painter surfaces, unlike MIG welding. But just like MIG welding, there are ways to identify a good vs. bad stick weld. These are.
Signs of a good stick weld
- Uniform weld surface with no cracking
- No or little spatter on the weld surface.
- Good penetration with the base metal
- Smooth weld surface with no pores visible on the surface
Signs of a bad stick weld
- Cracking of the weld surface
- A visible lack of fusion between the metals
- Excessive spatter
- Undercutting
Good TIG Welds Vs Bad Tig Welds
TIG welding is a welding process known for its aesthetically pleasing welds. However, the aesthetics of a TIG weld can create an illusion of a good weld. Here is what to look for in a good TIG weld.
Signs of a good TIG weld
- No signs of tungsten metal particles in the weld
- A smooth bead with a distinct pattern
- Lack of pores on the surface of the weld
- Visible signs of burnout
Signs of a bad TIG weld
- Lack of a filler metal used.
- A flat and wide bead without a distinct pattern
- Inclusion of tungsten in the weld
- Visible burnout and undercutting
Good Oxy Welds Vs Bad Oxy Welds
Oxyacetylene welding is a process where oxygen and acetylene gas are mixed and create a flame hot enough to melt metal. This is considered a somewhat old school way of welding.
Signs Of a good OXY weld
- Sufficient penetration on the underside of the weld
- A uniform welding line
- No pores present on the surface of the weld
- Complete fusion of the two metals
Signs of a bad oxy weld
- Lack of sufficient penetration on the underside of the weld
- Incomplete fusion of the metals
- Undercutting and overlapping
- Oversized welding line
Weld Inspection and Testing Methods
Some Defects that can’t identify in an open eye. Weld Inspection and Testing Methods are used to ensure that the welds on a structure are safe. The two most common methods of testing welds include the Non-destructive Testing Method and the Destructive Testing Method. Destructive testing is accomplished by cutting off parts of the welded material, while non-destructive testing is done without cutting anything.
Non-destructive Testing Method
This type of test is meant to locate and identify potential weld defects but does not break the surface of the welded items. Non-destructive testing is accomplished without cutting anything. It uses sensors and images to find out how the welds are doing.
List of Non-destructive Weld Testing Method
- Visual Inspection
- Liquid or Dye Penetrant Inspection
- Magnetic Particle Inspection
- Eddy Current Inspection
- Ultrasonic Inspection
- Transmission type of ultrasonic testing
- Reflection type of ultrasonic testing
- Acoustic Emission Monitoring
- Industrial Radiography
- Hardness Test
- Hydrostatic Test
- Magnaflux Physical Weld Test
- Ferrite Testing
Destructive weld testing method
The destructive method of weld test is a destructive test that needs to be done when the weld integrity is not known with certainty. It involves cutting off pieces of the welded materials in order to examine them more closely, which reveals any flaws that may have occurred in the welding process.
List of Destructive weld testing methods
- Macro etch testing.
- Fillet weld break tests
- Transverse tension test
- Guided bend test
- Free bend testing
- Back Bend Test
- Nick Break Test
- Toughness Testing
- Fatigue Behavior
- Hardness Test
- Tensile Tes
Conclusion
The ability to identify a bad weld is crucial to any welder. However, it is not always easy. However, when you know what to look for, it becomes possible to differentiate between good welds and bad welds.
